LaTeX tables cheat sheet
Find the table you need. Copy the code. Change the cells. Each example shows the LaTeX code and the table that LaTeX makes from it.
Do you prefer not to write the code? Make the table in the LaTeX Tables Generator and copy the code it makes. Each example below tells you how.
Start
Read the table code
Cells go from left to right. Rows go from top to bottom.
The shaded columns show the alignment only. LaTeX does not draw them.
Know the two environments
A table float must fit on one page. For a table that continues on
the next page, see Long tables.
A simple table
Write the cells row by row. The letters after tabular align the columns.
\begin{tabular}{lcr}
Name  & Type      & Price \\
Apple & Fruit     & 1.20  \\
Leek  & Vegetable & 0.85  \\
\end{tabular}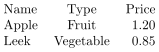
{lcr}makes three columns: left, centre and right aligned.- Write
&between the cells and\\at the end of each row. - LaTeX ignores extra spaces. Line up the
&signs to make the code easy to read. - A
tabularalone has no caption and no number. To add them, put it in atablefloat, as in the next example.
In our editor Type in the cells. Click the alignment buttons on the toolbar to align the text. The code under the table changes as you type.
A complete document
Save this code as table.tex. Compile it two times with pdflatex table.tex,
or open it in an online editor such as Overleaf. The second run puts the table number in the text.
\documentclass{article}
\usepackage{booktabs}
\usepackage{caption} % space under a caption above a table

\begin{document}

Table~\ref{tab:prices} shows the prices.

\begin{table}[htbp]
  \centering
  \caption{Prices of fruit}
  \label{tab:prices}
  \begin{tabular}{lr}
    \toprule
    Fruit & Price \\
    \midrule
    Apple & 1.20 \\
    Pear  & 1.50 \\
    \bottomrule
  \end{tabular}
\end{table}

\end{document}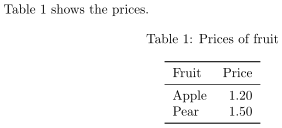
- Put the packages (
\usepackage) before\begin{document}. - Put
\labelafter\caption. Give each table a different label. Table~\ref{tab:prices}prints the table number. The~keeps the word and the number on one line.- Put
\captionafter thetabularto put the caption below the table. - Without the
captionpackage, a caption above a table touches its top line.
In our editor In the options under the code, select Caption: Above or Below and type the text and the label. Select Complete document to get the document with all the packages it needs.
Caption and placement
The letters after \begin{table} tell LaTeX where it can put the table.
LaTeX uses the first place that is possible. The letters do not force a place.
| Letter | LaTeX can put the table |
|---|---|
h | here, where the code is, if it fits |
t | at the top of a page |
b | at the bottom of a page |
p | on a page that has only floats |
! | with fewer limits (for example, a larger table at the top) |
H | exactly here. Needs \usepackage{float}. |
Start with [htbp]: it lets LaTeX use all four places.
A table with no place that it fits goes to the end of the chapter or document.
Lines
Lines around all cells
Draw a grid when each cell needs a border.
\begin{tabular}{|l|c|r|}
\hline
Name  & Type      & Price \\
\hline
Apple & Fruit     & 1.20  \\
\hline
Leek  & Vegetable & 0.85  \\
\hline
\end{tabular}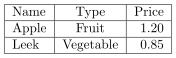
- A
|in the column letters draws a vertical line. \hlinedraws a horizontal line across all columns.- Put
\hlinebefore the first row and after each\\.
In our editor Click the all-borders button on the toolbar, or select Table › Add all borders.
Lines in some places
Draw a line under some columns only, or between two columns.
\begin{tabular}{l|rr}
Name  & 2024 & 2025 \\
\hline
Apple & 120  & 135  \\
Leek  & 80   & 95   \\
\cline{2-3}
Total & 200  & 230  \\
\end{tabular}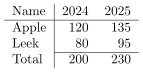
\cline{2-3}draws a line under columns 2 to 3.{l|rr}draws one vertical line, between column 1 and column 2.- For a line around one cell only, use
\multicolumn{1}{|l|}{text}(see Align one cell).
In our editor Click the border editing button on the toolbar. Then click the edges of the cells to add or remove lines. Hold Shift to change a full row or column.
Double lines
Use double lines to separate the header from the data.
\begin{tabular}{|l||r|r|}
\hline
Name  & 2024 & 2025 \\
\hhline{|=#=|=|}
Apple & 120  & 135  \\
\hline
Leek  & 80   & 95   \\
\hline
\end{tabular}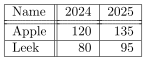
||in the column letters draws a double vertical line.\hline\hlinedraws a double horizontal line.- With vertical lines, use
\hhlineso that the lines cross cleanly:=is a double line under a column,-a single line,|a vertical line,#a double line crossing a double vertical line.
In our editor In border editing, select the double line button next to the border editing button. Then click the edges.
Publication style
Use three horizontal rules and no vertical lines, as journals and books do.
\begin{tabular}{lrr}
\toprule
Name  & 2024 & 2025 \\
\midrule
Apple & 120  & 135  \\
Leek  & 80   & 95   \\
\bottomrule
\end{tabular}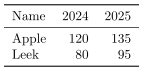
\toprulegoes above the header.\midrulegoes under it.\bottomrulegoes after the last row.- Do not use
|with booktabs. The rules have space around them, so vertical lines have gaps. - Write
@{}before and after the column letters, for example{@{}lrr@{}}, to make the rules end at the text.
In our editor In the options under the code, select Style: Booktabs.
Cells
Bold, italic and colour
Change the font of one cell.
\begin{tabular}{ll}
\textbf{Bold}             & \textit{Italic}            \\
\uline{Underlined}        & \texttt{Monospaced}        \\
\textcolor{red}{Red text} & \textbf{\textit{Both}}     \\
{\small Small}            & {\large Large}             \\
\end{tabular}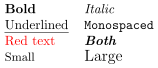
\ulineneeds\usepackage[normalem]{ulem}. Withoutnormalem, ulem changes\emphto underline.\textcolorneeds\usepackage{xcolor}.- The braces in
{\small Small}keep the size change in that cell. - To make all cells of a column bold, use
>{\bfseries}l. It needs\usepackage{array}.
In our editor Select the cells. Click B, I or U, or the text colour button, on the toolbar.
Align one cell
Align one cell differently from its column.
\begin{tabular}{|l|l|}
\hline
\multicolumn{1}{|c|}{Name} & \multicolumn{1}{c|}{Taste} \\
\hline
Apple                      & Sweet \\
\hline
\multicolumn{1}{|r|}{Leek} & Mild  \\
\hline
\end{tabular}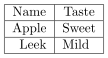
\multicolumn{1}{c}{Name}makes a cell of one column with its own alignment.- The cell's letters replace the column's letters, its lines too. Write the lines again:
{|c|}for the first column,{c|}for the next ones.
In our editor Select the cells. Click the alignment buttons on the toolbar.
Merge columns
Make one cell across two or more columns, for example a header over a group of columns.
\begin{tabular}{lrrrr}
\toprule
      & \multicolumn{2}{c}{2024} & \multicolumn{2}{c}{2025} \\
\cmidrule(lr){2-3} \cmidrule(lr){4-5}
Name  & Sold & Price & Sold & Price \\
\midrule
Apple & 120  & 1.10  & 135  & 1.20  \\
Leek  & 80   & 0.80  & 95   & 0.85  \\
\bottomrule
\end{tabular}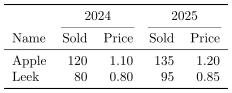
\multicolumn{2}{c}{2024}makes one centred cell across two columns.- The merged cell replaces the cells it covers. Write one
&less for each column it covers. \cmidrule(lr){2-3}draws a booktabs rule under columns 2 to 3.(lr)makes it shorter at the left and the right, so that two rules do not touch.
In our editor Drag the mouse over the cells to select them. Click the merge button on the toolbar. Click the split button next to it to undo it.
Merge rows
Make one cell across two or more rows.
\begin{tabular}{|l|l|r|}
\hline
Type                   & Name  & Price \\
\hline
\multirow{2}{*}{Fruit} & Apple & 1.20  \\
\cline{2-3}
                       & Pear  & 1.50  \\
\hline
Vegetable              & Leek  & 0.85  \\
\hline
\end{tabular}\multirow{2}{*}{Fruit}makes a cell across 2 rows.*makes it as wide as its text.- In the rows under it, leave the cell empty but keep its
&. - Use
\cline{2-3}, not\hline, so that the line does not cross the merged cell. - To wrap the text in the merged cell, write a width in place of
*, for example{2cm}, or{=}in a column with a width.
In our editor Select the cells in a column and click the merge button on the toolbar.
Merge a block of cells
Make one cell across columns and rows together.
\begin{tabular}{|c|c|c|}
\hline
\multicolumn{2}{|c|}{\multirow{2}{*}{Block}} & A \\
\cline{3-3}
\multicolumn{2}{|c|}{}                       & B \\
\hline
C           & D           & E \\
\hline
\end{tabular}
- Put the
\multirowin a\multicolumn. - In the rows under it, write an empty
\multicolumnof the same width:\multicolumn{2}{|c|}{}.
In our editor Select the block of cells and click the merge button on the toolbar.
Lines in a cell
Break the text of a cell into lines where you want.
\begin{tabular}{|l|l|}
\hline
\begin{tabular}[c]{@{}l@{}}Common\\ name\end{tabular}
  & \makecell{Price\\ (per kg)} \\
\hline
Apple & 1.20 \\
\hline
Leek  & 0.85 \\
\hline
\end{tabular}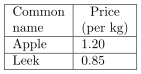
- A plain
\\ends the row. To break a line in a cell, put the cell's text in a smalltabular(as our editor does) or in\makecell. @{}removes the space around the small tabular, so the text lines up with the other cells.\makecellneeds\usepackage{makecell}. It centres the lines. Write\makecell[l]{...}to align them left.- In a column with a width (
p{3cm}), use\newline.
In our editor Double-click a cell to edit it. Press Enter to start a new line in the cell.
Width
Fixed column width
Give a column a width. Its text wraps to more lines.
\begin{tabular}{|l|p{3.5cm}|>{\raggedright\arraybackslash}p{3.5cm}|}
\hline
Name  & Justified text & Ragged right text \\
\hline
Apple & A sweet fruit that grows on trees in cool climates.
      & A sweet fruit that grows on trees in cool climates. \\
\hline
\end{tabular}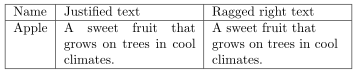
p{3.5cm}makes a column 3.5 cm wide. The text wraps and aligns at the top.- LaTeX justifies the text in a
pcolumn. In a narrow column, this makes wide spaces. >{\raggedright\arraybackslash}beforepaligns the text left.\arraybackslashmakes\\end the row again. This needs\usepackage{array}.m{3.5cm}centres the text vertically andb{3.5cm}aligns it at the bottom. Both need array.l,candrcolumns never wrap their text.
In our editor Drag the right edge of the column header above the table, or right-click the header and select Set column width. Double-click the edge to remove the width.
As wide as the text
Make a table as wide as the text on the page. Some columns wrap to fill the width.
\begin{tabularx}{\textwidth}{|l|X|X|}
\hline
Name  & Description                           & Use                               \\
\hline
Apple & A sweet fruit that grows on trees.    & Eat raw, bake or press for juice. \\
\hline
Leek  & A mild vegetable of the onion family. & Cook in soups and stews.          \\
\hline
\end{tabularx}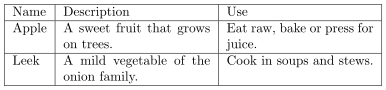
tabularxneeds\usepackage{tabularx}. Its first argument is the width of the table.Xcolumns wrap their text. They share the width that the other columns leave.\textwidthis the width of the text on the page. In a two-column document, use\columnwidth.- To give X columns different shares, write
>{\hsize=1.5\hsize}Xand>{\hsize=0.5\hsize}X. The shares must add up to the number of X columns.
In our editor In the options under the code, select Width: Wrap to text width. The columns with a width share the space in proportion to their widths.
Scale a table
Make the whole table larger or smaller, its text too, to fit a width.
\resizebox{\textwidth}{!}{%
\begin{tabular}{lrrrr}
\toprule
Name  & 2022 & 2023 & 2024 & 2025 \\
\midrule
Apple & 101  & 110  & 120  & 135  \\
Leek  & 62   & 71   & 80   & 95   \\
\bottomrule
\end{tabular}%
}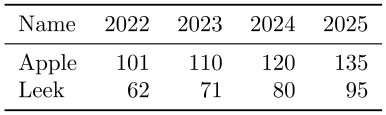
\resizebox{\textwidth}{!}{...}scales the table to the text width.!keeps the proportions. It needs\usepackage{graphicx}.- The text size changes with the table. Large text or very small text is difficult to read. If possible, wrap the text in place of scaling.
- The
%signs at the line ends stop extra spaces. - You cannot scale a long table.
In our editor In the options under the code, select Width: Scale to text width or Scale to column width.
Space in a table
Make the rows higher or the space between the columns larger.
{ % The braces keep the changes local
\renewcommand{\arraystretch}{1.4}
\setlength{\tabcolsep}{12pt}
\begin{tabular}{lr}
\toprule
Name  & Price \\
\midrule
Apple & 1.20  \\
Pear  & 1.50  \\
\addlinespace
Leek  & 0.85  \\
\bottomrule
\end{tabular}
}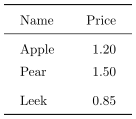
\arraystretchmultiplies the height of the rows.1.4is 40% higher.\tabcolsepis the space at each side of a column. The default is 6pt.\addlinespace(booktabs) adds space between two rows.- Put the changes in braces, or in the
tablefloat, to change only this table.
Colour
Cell and row colour
Give a cell or a row a background colour.
\begin{tabular}{lrr}
\rowcolor{gray!25}
Name  & 2024 & 2025                    \\
Apple & 120  & \cellcolor{green!25}135 \\
Leek  & 80   & \cellcolor{red!25}75    \\
\end{tabular}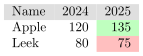
- Colours need
\usepackage[table]{xcolor}. \rowcolorgoes at the start of the row.\cellcolorgoes in the cell.green!25is 25% green and 75% white.- To use your own colour, write
\definecolor{mygreen}{HTML}{C8F2C8}in the preamble. - To colour a column, write
>{\columncolor{gray!15}}lin the column letters.
In our editor Select the cells. Click the background colour button on the toolbar.
Striped rows
Give the rows two colours that alternate, so that long rows are easy to follow.
\begin{table}[htbp]
\centering
\rowcolors{2}{gray!15}{white}
\begin{tabular}{lr}
Name  & Price \\
\hline
Apple & 1.20  \\
Leek  & 0.85  \\
Pear  & 1.50  \\
Plum  & 2.10  \\
\end{tabular}
\end{table}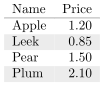
\rowcolors{2}{gray!15}{white}: from row 2, odd rows are grey and even rows are white.- It needs
\usepackage[table]{xcolor}. - Put it in the
tablefloat. If not, it changes all the tables after it.
In our editor Give the rows alternating background colours. Our editor writes \rowcolors for four or more such rows.
Content
Align numbers
Align the numbers of a column at the decimal point.
\begin{tabular}{lS[table-format=3.2]}
\toprule
Test & {Time (s)} \\
\midrule
A    & 2.5        \\
B    & 12.30      \\
C    & 105.07     \\
\bottomrule
\end{tabular}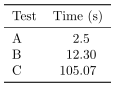
- An
Scolumn (needs\usepackage{siunitx}) aligns numbers at the decimal point. table-format=3.2keeps space for 3 digits before the point and 2 after it.- Put text in braces,
{Time (s)}, so that siunitx does not read it as a number.
Math and special characters
Write formulas in cells. Escape the characters that LaTeX uses for its code.
\begin{tabular}{ll}
Formula     & $E = mc^2$, $\alpha \le \beta$ \\
Percent     & 50\%                           \\
Ampersand   & R\&D                           \\
Underscore  & file\_name                     \\
Dollar      & \$10                           \\
Hash        & \#1                            \\
Braces      & \{ \}                          \\
Backslash   & \textbackslash{}               \\
Tilde       & \textasciitilde{}              \\
Caret       & \textasciicircum{}             \\
\end{tabular}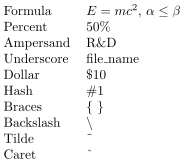
- Put math between
$signs. - A plain
&ends the cell and a plain%starts a comment: the rest of the line is lost. Write\&and\%. - See all the characters in Characters to escape.
In our editor In the options under the code, Escape special characters escapes them for you. Clear it to type LaTeX, such as $x^2$, in the cells.
Notes under a table
Add notes under a table and marks in the cells that refer to them.
\begin{table}[htbp]
\centering
\begin{threeparttable}
\caption{Prices}
\begin{tabular}{lr}
\toprule
Name           & Price \\
\midrule
Apple\tnote{a} & 1.20  \\
Pear           & 1.50  \\
\bottomrule
\end{tabular}
\begin{tablenotes}
\footnotesize
\item[a] Price in March.
\end{tablenotes}
\end{threeparttable}
\end{table}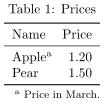
threeparttablemakes the caption and the notes as wide as the table.\tnote{a}puts the mark in a cell.\item[a]gives the note's text.- Do not use
\footnotein atabular: LaTeX does not print its text.
Size
Long tables
Let a table with many rows continue on the next pages.
\begin{longtable}{lr}
\caption{Prices of fruit}\label{tab:prices} \\
\toprule
Name & Price \\
\midrule
\endfirsthead
\multicolumn{2}{l}{Table \thetable{} -- continued} \\
\toprule
Name & Price \\
\midrule
\endhead
\midrule
\multicolumn{2}{r}{Continued on next page} \\
\endfoot
\bottomrule
\endlastfoot
Apple & 1.20 \\
Pear  & 1.50 \\
% ... many more rows ...
\end{longtable}longtableneeds\usepackage{longtable}. Do not put it in atablefloat: it makes its own caption.- The rows before
\endfirstheadstart the table. The rows before\endheadstart each next page. - The rows before
\endfootend each page. The rows before\endlastfootend the table. - Compile the document two or three times: longtable finds the column widths over more runs.
- For a long table with
Xcolumns, usexltabular.
In our editor In the options under the code, select Long table: Split across pages. You can also repeat the header rows and add a "continued" line.
Wide tables
Put a table that is too wide on a page turned sideways.
\begin{landscape}
\begin{table}[htbp]
\centering
\caption{Monthly sales}
\begin{tabular}{l*{12}{r}}
Name  & Jan & Feb & Mar & Apr & May & Jun
      & Jul & Aug & Sep & Oct & Nov & Dec \\
\hline
Apple & 120 & 118 & 125 & 130 & 128 & 140
      & 151 & 149 & 160 & 171 & 166 & 180 \\
\end{tabular}
\end{table}
\end{landscape}landscapeneeds\usepackage{pdflscape}or\usepackage{lscape}. With pdflscape, PDF viewers show the page turned.- The landscape page starts on a new page.
- Before you turn the page, try to make the table narrower: wrap long text in columns with a width, make the headers shorter, use
\small, or make\tabcolsepsmaller. - In a two-column document, use
table*in place oftableto put the table across both columns.
In our editor In the options under the code, select Placement: Rotate to a landscape page.
Reference
Column types
| Letters | Column |
|---|---|
l c r | Left, centred, right. As wide as the text. |
p{3cm} | 3 cm wide. Text wraps, aligned at the top. |
m{3cm} | Text wraps, centred vertically. Needs array. |
b{3cm} | Text wraps, aligned at the bottom. Needs array. |
X | Shares the free width. Text wraps. Needs tabularx. |
S | Numbers aligned at the decimal point. Needs siunitx. |
| || | A single or double vertical line. |
@{} | No space at this side of the column. |
*{4}{r} | The same as rrrr. |
>{\bfseries}l | Applies a command to all cells of the column. Needs array. |
To use a ragged-right column with a width many times, define it in the preamble (needs array):
\newcolumntype{L}[1]{>{\raggedright\arraybackslash}p{#1}}Then write L{3cm} in the column letters.
Packages
| Package | For |
|---|---|
| booktabs | \toprule, \midrule, \bottomrule, \cmidrule |
| multirow | \multirow |
| hhline | \hhline: lines that cross cleanly |
| array | m, b, >{...} columns |
| tabularx | tabularx, X columns |
| xcolor | Colours; with [table]: \rowcolor, \cellcolor, \rowcolors |
| graphicx | \resizebox |
| makecell | \makecell: lines in a cell |
| siunitx | S columns |
| threeparttable | Notes under a table |
| longtable | Tables across pages |
| pdflscape | Landscape pages |
| float | The [H] placement |
In Beamer presentations, use \usepackage{colortbl} for colours in tables:
Beamer loads xcolor itself.
Characters to escape
These characters are part of LaTeX's code. To print them in a cell, write:
\&\%\$\#\_\{\}\textasciitilde{}\textasciicircum{}\textbackslash{}\textless{}\textgreater{}Errors and fixes
| LaTeX says or does | Do this |
|---|---|
| Extra alignment tab has been changed to \cr | A row has too many & signs. A row of n cells has n − 1. Count a merged cell as the columns it covers. |
| Misplaced \noalign | A \hline or rule is not after a \\. Add the \\ at the end of the row before it. |
| Undefined control sequence \toprule (or \multirow, …) | Add the package to the preamble. See Packages. |
| Unknown column type X (or m, S, …) | Add the package. X also needs the tabularx environment, not tabular. |
| Overfull \hbox: the table goes into the margin | Wrap long text in a column with a width, or make the table as wide as the text. |
| The table is on another page | A float moves. Use [htbp]. For "exactly here", use [H] with the float package. |
| The reference shows ?? or a wrong number | Put \label after \caption. Compile again. |
| The text after % is missing | % starts a comment. Write \%. |
| The table goes past the bottom of the page | Use a long table. |
Change a table that you already have
Open the LaTeX Tables Generator and select File › From LaTeX code. Paste the code of your table. Edit the table, then copy the new code.